![[Brads Electronic Projects]](https://bradsprojects.com/wp-content/uploads/2017/06/BPLogo1-240x58.png)

You can purchase Retroball from my Tindie store: Unfortunately I have sold out of Retroball units – however you can still build your own since all of my projects are open source. Check out the download link at the bottom of this page for all the details you need to build your very own retroball!
![]()
Retroball is a build-it-yourself kit which follows in the footsteps of the classic ‘PONG’ style video games. Retroball allows you to play with two, three or four players and up to five balls on the screen at the same time. Retroball was funded on Kickstarter, raising $25,407AUD thanks to 218 backers!
Build instructions and downloads can be found at the bottom of this page, just before the comments section.


With a step-by-step building video and less than a dozen components to solder in – Retroball can be put together by even a newcomer to electronics. Retroball can be powered by any standard USB port, USB charger or USB charge bank.


Each game mode can be played with two, three or four players:

- One Ball Easy – Slower game play which is great for beginners.
- One Ball Hard – Fast paced action to test your reflexes.
- Five Balls – Can you handle the mayhem?

The ball may be spun off the bat in different directions, at different angles and speeds depending on how you hit the ball. It makes for some great gameplay!

If you miss a ball, you lose a point. If you lose all of your points, your paddle is replaced with a wall. The last player standing – wins!

- Soldering Iron and Solder
- Phillips ScrewDriver
- Pliers

- 240mm x 240mm Matte Black Circuit Board
- Tinted Screen Filter
- 32 x 32 Pixel RGB LED Matrix Display (160mm x 160mm)
- 8 Potentiometers (Four of which are spares)
- 4 Potentiometer Knobs
- USB Connector
- LED Matrix Ribbon Cable + Connector
- LED Matrix Power Cable + Connector
- Two Push Buttons
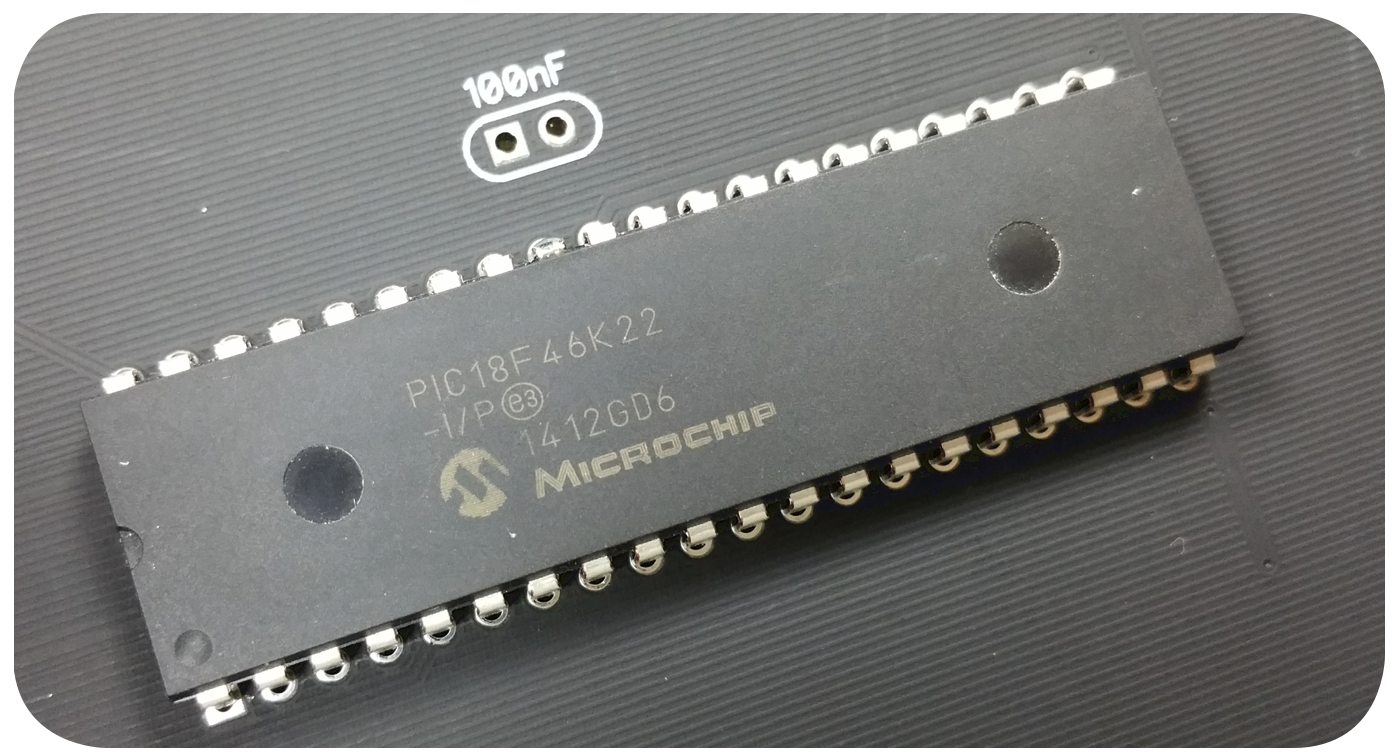
- PIC 18F46K22 Microcontroller (Pre-programmed with Retroball)
- Filter Capacitor
- USB Cable
- 40 Pin 0.1″ (2.54mm) Male Headers (For those who wish to experiment with their Arduino Uno)

For those who want to run their own experiments, Retroball comes with a built in slot for you to plug in your own Arduino Uno or compatible microcontroller. Just download the Adafruit Library and get coding! (Note: only two of the four potentiometers are available for your Arduino due to limited pins on the Arduino). Some example will be provided to get you started.
An Arduino is not required to make Retroball work however.


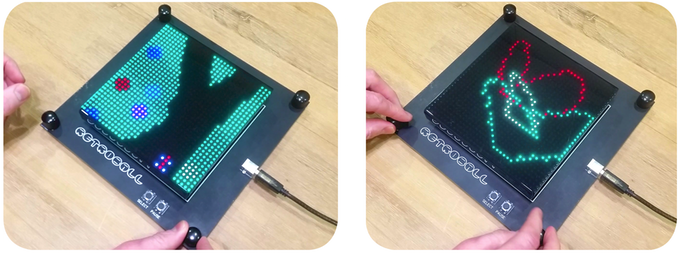
A hidden menu gives you access to these extra features:
- Screen Pixel Test
- Potentiometer Controller Test
- Screensaver 1
- Screensaver 2
- LED Sketch (Like etch-a-sketch)
- The Great Race
- Dice
![]()
- PCB dimensions 24cm x 24cm (9.5″ x 9.5″)
- LED Matrix Dimensions 160mm x 160mm
- Completed kit weight approximately 650grams (1.43lb)
- Packaged weight approximately 1.1kg (2.43lb)
- Retroball is powered by an 8-bit PIC 18F46K22 Microcontroller running at 64Mhz with 64KB of program memory and 3.8K of SRAM.
- The LED matrix contains 1024 RGB LED’s which provides a 32 x 32 pixel playing area.
- Backers are also able to use their own Arduino Uno (or compatible) microcontroller by soldering in the 0.1″ male headers (which are provided with every kit). You can then download the Adafruit library to code your own experiments. I will provide details and some sample code to get you guys started.
RetroBall kit Unboxing Video (Showing all the parts which are included in the kit):
Retroball Kit Construction Video
(Please note – The video does not show when to plug the PIC microcontroller in to the socket, but you can simply plug this in immediately before connecting the LED matrix display.)
How to get your Arduino Uno up and running on Retroball
Retroball files containing BOM, sourcecode, Arduino libraries (thanks to Adafruit) and examples, PCB design and gerber files and schematic can be downloaded below:
Note – this zip archive has been updated to include the required libraries for the Retroball sourcecode.
Retroball Files (4020 downloads )The following download contains only the Arduino Libraries and example sketches. This is provided as a seperate download since it makes importing it into ‘Arduino Create’ a much simpler process.
Retroball Arduino Libraries and Examples (3532 downloads )

United Airlines Seat Selection : Choose Best Seats
United Airlines provides the best seating assignment onboard the plane, ensuring the flyer’s safety and comfort to the fullest. You can log into the account; choose the preferred seats from the United Airlines seat selection on the official site. Besides, talk to the live person and request a seat upgrade for the upcoming trip.
Hi Brad, I finally managed to solder together your great retro-ball! (I hope you still remember it, its been such a long time). Two questions: Is there a one-person game mode as well? I can only get 2,3,and 4 player games when turning the potentiometer. Also, as I am not a gamer per se, can you give me a hint (or just outright tell me) where I can find the hidden menu please? Love the things you have put together, hopefully it wont take me as long to play with your digitale 2A (another great KS campaign, super super well… Read more »
Have anyone brought the Retroball game to Arduino? Curious to have it running on the board with Arduino setup.
Hi Brad, I lost the screws and spacer to connect LED display and circuit board (chaotic workplace while toying with the Arduino…).
Please advise dimensions of the screws and spacer, so I can get new ones!
Thx Sören
Does anyone know about a good solution to power Retroball using a battery? Ideally would be a mountable solution to the PCB.
Hi Marco, you could use one of the following options:
– USB portable battery bank
– 9V battery with a 7805 voltage regulator to drop the voltage down to 5 volts
– 3.7V lithium ion battery with a step-up converter (such as the mt3608) to step the voltage up to 5 volts.
Thanks brad for the quick reply. I looked up the specs of the matrix display and it can consume up to 4A. Therefore I was a bit nervous about buying a USB power bank which commonly supplies 2.4 to 3A max. But my 2A USB charger works with all LEDs on (I tested blue/green/red), so I’ll go with a power bank. My plan is to mount it left of the Arduino between board and display. It may have a max size of 10mm x 4mm x 18mm when measuring the space left. I can’t really find a power bank that… Read more »
Hi Brad,
Do you know when/if you will have these kits back in stock? I want one!
Thanks!
Sorry Steve, I must have missed your comment. I should have about a dozen more for sale in the next month or so on Tindie.
Looking forward to it!!
Just put together my retroball kit. How fun! The instructions were easy to follow to get it up and running. Just one thing… how do I get to the hidden menu?
Actually, never mind. Figured it out! Very cool. Thanks again!
sold out … pfff
sicks
Hi Brad,
Retroball Arduino Libraries and PCB design download link does not work, Is it possible to correct it?
Thanks.
Hi Ramin, I’m not sure how the links became broken but I have fixed them up now. Let me know if they still don’t work for you however.
Thanks Brad.
Every thing is OK 🙂
Hey Brad, what do u think, when is Retroball back in Stock ?
Hi Kim. It will probably be a couple of months due to other projects I have been working on and there is a two week holiday coming up in china which means things are busy there a week prior and a week after this holiday as well as manufacturing coming to a standstill during the holiday. Sorry for the delay!
Hey do you have a contact email I could possible use to get in touch am having an issue with my Retroball and could do with some support
I’ll send you an email Owen.
Hi Owen, did you receive my email?
Where can I buy this?
Hi Rich, you can get them from my Tindie Store here:
https://www.tindie.com/products/bradsprojects/retroball-build-it-yourself-pixel-fun/
Please note that the retroball circuit boards have scratches on them due to a manufacturing error. They still work perfectly fine however. Also – due to the business of Christmas and end of year – shipping is taking longer than normal.
Hi, when will it be available for sale?
Hi Wally, you can get them from my Tindie Store here:
https://www.tindie.com/products/bradsprojects/retroball-build-it-yourself-pixel-fun/
Please note that the retroball circuit boards have scratches on them due to a manufacturing error. They still work perfectly fine however. Also – due to the business of Christmas and end of year – shipping is taking longer than normal.
out since july and i can’t click a button to buy.. kickstarters supporters must be pissed..
I’m not sure what you’re talking about – you can’t buy it because I haven’t advertised them for sale outside of the Kickstarter campaign. The campaign ended months ago and all Retroball kits have been posted to backers.
Hello, The Retroball arrived in Luxembourg 🙂
Brad,
I bought this for my brother who has his own company.
I want to add the option to add a second welcome screen to ADG ROCKS.
Is the source code available yet? I probably need all the time I can get before Christmas.
Thanks
Hi Peter, I’ll be putting together the BOM, sourcecode, pcb design etc for download soon – I apologise for the delay but i’ve been quite busy with other bits and pieces lately. You will be able to add a second welcome screen however the IDE that I use is swordfish basic which costs about $100. There is a free version available but you won’t be able to compile anything which requires more than 256 bytes of SRAM. Retroball requires over 600 bytes of SRAM so you wouldn’t be able to use the free version.
Have you used Swordfish basic before?
I haven’t used Swordfish basic, no. I generally work with C. I’ve never used a PIC before, either. I’ve just started to see what I’ll need to add a few bytes to the code.
Hi The retroball arrived in the UK quickly and I would like to make a tetris platform. Would any one know a good script to hack?
Hi Karl obviously you have seen the replies on Kickstarter regarding Tetris but I’ll reply here for others to see also. Kickstarter user Defragster is working on a Teensy port of Tetris so it will be great to see what he comes up with 🙂
Hi, I just got my Retroball kit, and was able to put it together just fine, and it seems to work great. I need to try the hidden menu.
However, I watched the videos, and wanted to let you know, that my kit did not include a cable, I just used one I had, but thought you should be aware that it was not in the box, incase you need to talk with your distributers.
I’m very sorry that you didn’t receive a USB cable with yours. They obviously must have forgot to put yours in. Did you want me to get one sent out to you?
Hi Brad, just got the kit setup successfully, it works great. Can you please upload those document on setting up Arduino and sample code? and also how to access the secret menu? cheers,
Hi Jerry. Sorry for not having arduino details up yet but for starters you can try downloading the adafruit led matrix and graphics files to experiment with an Arduino – be sure to take out the pic microcontroller however. Also, you can access the secret menu by going to the retro ball title screen then turning the red player knob fully left then fully right then fully left.
Thanks Brad the kit works great, and it feels of good quality. I got in the secret menu, can you please post an update on KS once the details are available? Btw I have some question regarding the Arduino. Which pins are available as I want to connect an ESP8266 module to the Uno. Thanks!
Hi Brad – just got my Retroball kit altogether. It rocks! Thanks!!! I still can’t seem to access the secret menu doing what you are describing. I power it on and on the first screen I turn the red player’s knob fully left, fully right, then fully left and nothing happens. Help – thanks! 🙂
Sorry for the delayed reply Matt. Are you doing it on the RETRO BALL titles screen? If so – then it is strange that the secret menu doesn’t come up when you rotate fully counter clockwise, fully clockwise then fully counter clockwise again. Do you have a multimeter? if so are you able to check the voltage between the centre connection of the red player potentiometer and any one of the outside connections – to see if it goes pretty well to 0 when rotate one way and close to 5v when rotated the other way?
Hello – I just checked it and the red pot goes fully from 0-5v on both sides of center. I am trying it from the RetroBall title screen, too. Also, I wanted to let you know how much my kids love it. I really enjoyed putting it together with them and it makes a great coffee table toy to leave out for our teenage guests to play with. I had a small USB battery pack laying around about the size of a small cellphone. It fits perfectly on the top of the circuit board just underneath the display so that… Read more »
I’ll be posting an update once I have a few more things documented for the Arduino however I can tell you that the LED matrix uses a lot of connections – couple that with the two potentiometers and two buttons which the Arduino is connected to and I think you only have D13 left free.
Hi Brad, nice project! I love it. What is your expectation that this kit will be for sale? Thanks. Kind regards, Olav
Hi Lavski – I have sent you an email with some details.